
Lewmar Low/Medium Profile hatch - release hinges
- Rowland Smith
- Dec 20, 2023
- 4 min read
There are various versions of this hatch, but here we focus on the older variant with Type B hinges. For more details on the various types see here.
Whether you have the hatch removed or still in place the principles below still stand. It's probably only slightly easier on the bench.
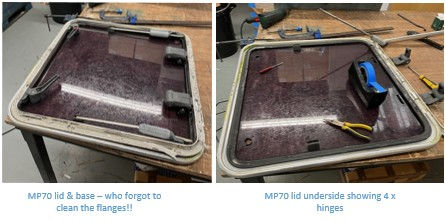
So here we have a Mk2 Medium Profile (MP) size 70 hatch. This has four hinges, where as most smaller variants will have two. The other thing to note in passing here is that this has a bright finish (looks a bit like a stainless hatch) which is no longer offered by Lewmar (so no replacements).
The client elected not to clean the flanges so we'll do that later and add the cost! PLEASE CLEAN YOUR FLANGES.

The first task is to remove the hinge caps. These are grey plastic and after years of UV exposure may be faded and brittle. Do not attempt to lever these off from the top as they will break. Instead use a screwdriver from the back face and lever up the lower edge of the cap. It will rise and can then be taken off. Note that if installing a hinge kit then new caps are included.

At this point you will discover which type of hinge you have, Type A or Type B. These are Type B which feature a central expander (nut/bolt) and two sets of wedges, the outer of which hold the (~2mm dia) hinge pin (more on this later). The components are shown here.

The hinge pin and mounting plug (2 shown right) fit into the base frame. When installed, the end of the outer wedge fits on the pin and it is this that constitutes the actual hinge bearing surface. This is a very small surface which is why in practice the plastic plug can fail and the pin wobble around causing the lid to not close properly (as was the case here).
But we're getting ahead of ourselves as first we need to remove the expander. This is in effect a barrel nut (the fat part) and a bolt (the thin part) with a head that has two holes drilled through at 90 degrees. We have to wind the head back into the barrel, but first we need to release the thread which Lewmar will have locked with Loctite. We do this by applying heat (gun) and fluid (white spirit).

We then use small mole grips to hold the barrel and a spiked tool (or allen key) to insert in the head and rotate this clockwise to screw into the barrel. I use mole grips because although there are holes in the barrel these are depth limited by the screw thread which makes getting a spike in difficult.

Next we need to get the wedges out. For the inner ones, place a screw driver in the rebated end and tap out (towards centre of hinge). Don't force as the ends will just crumble. Be patient and they will come out.

Now for the outer wedges. I find the easiest way to extract these is with a bent spike tool. Insert the end into the alloy slot, push the point into the plastic wedge and then lever it out. It 'may' come out with the hinge pin in the end, but probably not, leaving the pin attached to the plug in the base frame.
Assuming the hinge pins have not come out, these will still be in the base frame preventing the lid from being removed from the base. If so, the next step is to push these pins into the frame plugs. I do this with a 2mm drift (easier if bent), feeling for the pin end and then tapping it in. When both are done the hinge should be released. Do for all hinges and the lid should now come away from the base.
If your hinges are type B as above it's worth noting that you will almost certainly need new replacement hinge kits for two reasons; Firstly, the pin/plug will be virtually impossible to remove from the base, so will need to be pushed further in*, out of the way making the existing hinge components unusable and secondly, because the replacements feature an alloy insert with a much larger bearing surface which will help ensure the bearings don't wear. Each kit contains parts for two hinges (so two kits needed here) and are approx £55 + VAT each.
Now you can split the lid frame to remove/release the acrylic and seal (or get us to :-). Take a look at the next article Lewmar Low/Medium Profile hatch - split lid frame
*note that if the hatches are MK1, fitted with roll pins on each side of the lid hinge mount it will not be possible to push the plug/hinge pin remains in unless you first remove the roll pin. Removing the roll pins is tricky so you may elect to dig out the plug by whatever means necessary, remembering that this is scrap now anyway.


Comments